Our Very Large Tile Floor Redo February 7, 2015
Our Very Large Tile Floor Redo
Relocating and house hunting hasn’t been an easy task by any means. I traveled an hour and forty minutes back and forth from my temp home to where I was house hunting two to three times per week. I know – crazy, right?! Did I mentioned I had the kids with me too? Wow, thinking back I realize that I was stressed, tired and under a lot of pressure to find a home before the school year started so my children wouldn’t have to change school yet again. Thankfully it all panned out.
After finding the right home, I soon realized the long road ahead of me – us – and me. Thankfully the floors were not one of them. HA!
First things first, hire people to help remove the not so great tile.
Even though some tiles came up pretty easy, there was still an entire home full of stubborn tiles.
We did get a little help from my son. He’s learning young.
Were making progress but he floors are so uneven.
This pile is from the kitchen and some of the family room. ONLY!
Out with the tile in the laundry room.
Remember I mentioned stubborn tile? Well these tiles needed a bit more power to remove them. Poor guys. I’m just glad I didn’t have to do it.
After all the tile was broken up and the floors were chiseled as smooth as we could get it, we then lugged all of it out and into a dumpster.
Happily we received the tile two days later. Excitement settled in.
A week after that, the tile guys came and started the job. Oh Yeah!
We did noticed we had a pretty significant crack on the concrete once all the tile was gone so the tile guys started to seal it which I was told was the correct way to handle this situation. Apparently, not everyone has this done and regrets come after.
Once the sealant was dry, the tile laying planning began.
The guys have finally madesome headway and I can see how beautiful the floors are going to look!!
Little by little, one by one, day after day, the tiles get put down. I guarantee te floors will look fabulous.
My poor Nike’s have REALLY taken a beating with this redo. But no worries. they can easily be replaced.
For the foyer we decided to design a different pattern and use an accent tile. We played with many ideas and love the finish product. The tile guys were very particular and wanted the foyer to come out perfectly and we appreciated that. With that being said, it was the last area to get tiled and we really just wanted the floors to be done.
How great does the tile look?! I absolutely love it!!
Uh Oh – someone tiled himself into a corner.
Oh wait, he can just open the door. Nevermind.
Done!
Or are we?
We ended up with some extra accent tile and the tile guys made an awesome suggestion.
Adding a full tile sheet in the middle of the foyer in a diamond shape. Really when we see it now, it was like a no brainer. I guess that’s why they are the professionals and I am not. HA!
After precise measuring…
the cutting began.
And there she is; a perfectly measured and cut out diamond.
Looks Great!! Now grout it guys and get out!
I mean-thank you guys I greatly appreciate all your hard work! 🙂
3 Ingredient Brownies February 6, 2015
I decided to share one of my all time favorite use for Nutella. My 3 Ingredient Brownies. Your welcome!
Preheat oven to 350 degrees F and butter spray an 8×8 inch pan.
The most obvious first ingredient is Nutella. 1 1/4 cups (13oz) of it.
Add 1/2 cup of all purpose flour.
Then 2 large eggs.
Mix all 3 till the mixture is creamy. Pour into the 8×8 inch pan. Smooth evenly.
Bake for 25-30 minutes. Make sure to not over bake or the brownies will dry out and harden.
Once cooled, cut and Enjoy!!
Note:
You can add toppings like nuts, chocolate chips or whatever you decide. They taste great either way.
For a larger batch: 2 1/2 cups Nutella, 1 cup of flour, 3 eggs. Mix. Spray pan Bake 25 minutes.
Happy Baking,
Jackie
Minecraft Creeper Valentine Box January 22, 2015
Every year my children have a Valentine party at their school and the teachers ask them to bring in a shoebox of sorts to put all their valentines and treats in. It’s a cute project and I love their ideas when it comes down to figuring out just what they want to create. My son is very much into the game Minecraft and well, his choice didn’t surprise me. Honestly, once he decided the character he wanted to make, I know it would be easy.
Here’s my handsome boy. Yes I know he needs a haircut but regardless-handsome!
First things first, gather all the materials. Creating a pixel effect was the simplest thing ever. All I had to do was cut 2×2 squares of construction paper with the colors of choice. Easy, right?!
Once the box was assembled, it was just a matter of gluing each square on to create the pixel effect. We decided the glue stick would work just fine and it did. Square after square, you can see it coming together. I basically guided him at the beginning and from there he caught on.
Next, we cut out the shape of the eyes and mouth and glued on once all the pixels were in place.
There it is. I decided to cut out a hole on the top of the box verses the original one because we wanted the face visually centered.
And that’s that! Done!
Happy Pixeling,
Jackie
Elsa’s Ice Palace Valentine Collection Box
from Disney’s Frozen Movie
This year my daughter Arianna decided on Elsa’s Ice Palace for her Valentine Box. She has loved the movie since we seen it in December and the love for the movie is still strong so really choosing Frozen for er theme wasn’t a surprise.
First things first, you need a box. I didn’t have any shoe boxes in the house so i had to buy one.
I found the perfect blue wrapping paper to cover the box with.
Wrap the box as you would a present. Easy!
I did decide to cover the opening and cut a new one on the top instead.
When I went shopping, I looked for snow flake stickers to match the palace color. I also found beautiful silver glitter paper.
Arianna wanted the stairs to shimmer so we ended up using the glitter paper for that which was really only intended for the palace towers and icicles. Great idea by her, right?!
We used her coloring book cover for inspiration. Here you can see the stairs leading up to the door. That’s where the idea came from…oh, and the stickers of the characters she placed in the scene on the box came inside the coloring book. All her ideas.
These cute little cotton balls were perfect to create a snow scene.
I wrapped the paper towel card board rolls with the wrapping paper while she was gluing. Then I had to hot glue the tops so I had Arianna pinch them while it dried.
Using the remaining paper I cut them and shaped them to create the tops of the towers. Once everything dried, I hot glued the two towers onto the box.
I think it looks wonderful. It’s not perfect and that’s what’s perfect about it. Arianna did all the cutting, sticker placement and gluing (accept the hot gluing). Afterall, it is her project and not mine.
I did help with the icicle cutting. I think she was getting tired at this point.
We glued on the icicles at the tops of the towers and then she place the letter stickers for her name.
There it is…Elsa’s Palace through Arianna’s eyes.
Happy Valentine,
Jackie
Bathroom Makeover November 21, 2014
My Bath Reno
It took a lot of hard work, sweat, tears and blood to make it happen but doesn’t it look gorgeous?
Here are the before pictures. Standard build grade EVERYTHING.
We decide to use products from our local Big Box stores and supported a local business as well. I am pleased with the mixture of products we went with. Here my husband is installing a chrome lighting fixture we found at Home Depot.
Hampton Bay Levan Collection 3-Light Chrome Vanity Sconce
Model # 173353-15
Internet # 203595941
I customized a paint color for my bath and here is the color match I came up with. I love this gray tone with a hint of creaminess.
Now for my ridiculous, amazing tile floors. Can you here the angels singing?
These tiles were also found at Home Depot.
I Know!! Can you believe it?!
MONO SERRA Italia Zen Gris 12 in. x 24 in. Porcelain Floor and Wall Tile (LOVE!!)
If you thought I was in love with my floors, well I am BUT I really LOVE my granite just as much. The angels are singing once again. Gasp.
We choose the white undermount sink for a crisp, clean look.
How’s it look? Here we are simple waiting for the mirror decision. This was a difficult decision and I’m pleased with the last one made.
Check it out!
The chrome touches with the faucet and soap/lotion dispenser I found at Bed Bath and Beyond just ties everything together nicely.
The Lattice Shower curtain, towels and bath rug were also from Bed Bath and Beyond.
So happy it’s all done.
Happy Showering,
Jackie
Pumpkin Swirl Brownies September 26, 2014
This is the start of my favorite season and all things pumpkin. So what’s a better way to start than with
Pumpkin Swirl Brownies!
Prep Time: 30 mins
Bake Time: 60 mins
Here are the ingredients:
- 3 ounces cream cheese, softened
- 1 tablespoon butter, softened
- 1/2 cup sugar
- 1 egg
- 1 cup canned pumpkin
- 1 teaspoon vanilla
- 1/2 teaspoon ground cinnamon
- 1/4 teaspoon ground ginger
- 1 tablespoon all-purpose flour
- 1 1/4 cups all-purpose flour
- 3/4 teaspoon baking powder
- 1/2 teaspoon salt
- 6 ounces unsweetened chocolate, chopped
- 3/4 cup butter, cut up
- 2 1/4 cups sugar
- 4 eggs
- 1/4 cup milk
- 2 teaspoons vanilla
- 3/4 cup coarsely chopped walnuts, toasted (optional)
So let’s get started.
Preheat oven to 325 degrees F.
Line a 13x9x2-inch baking pan with foil, extending foil over the edges of the pan. Grease the foil; set pan aside.
In a medium mixing bowl beat cream cheese and the 1 tablespoon butter with an electric mixer on medium to high speed for 30 seconds.
Add the 1/2 cup sugar.
Beat until well combined, scraping sides of bowl occasionally.
Beat in 1 egg, 1 teaspoon vanilla,
the pumpkin,
the cinnamon, and ginger until combined.
Stir in the 1 tablespoon flour.
Set aside.
In a small bowl stir together the 1-1/4 cups flour, the baking powder, and salt; set aside.
In a large saucepan combine the chocolate and 3/4 cup butter.
Cook and stir over low heat until melted and smooth.
Remove from heat.
Gradually add the 2-1/4 cups sugar, beating with an electric mixer on low speed just until combined. Add the 4 eggs, one at a time, beating well after each addition. Beat in milk and the 2 teaspoons vanilla. Gradually beat in flour mixture just until combined.
Spread chocolate mixture evenly in the prepared pan.
Spoon pumpkin cream cheese mixture in several mounds on top of the chocolate batter.
Using a narrow spatula, gently swirl the cream cheese mixture into the chocolate batter. If desired, sprinkle with walnuts.
Bake about 60 minutes or until center is just set when pan is gently shaken. Cool in pan on a wire rack. Use foil to lift uncut brownies out of pan. Cut into brownies.
- Layer brownies between sheets of waxed paper in an airtight container; cover. Store in the refrigerator for up to 3 days.
- BHG Pumpkin Brownies
Happy Pumpkin Baking,
Jackie
I’ve certainly lived up to my blogging name September 15, 2014
I’ve certainly lived up to my blogging name TheSuperBusyWoman. If you’ve been following, then you know I have relocated to Florida from Illinois. Let me tell you it’s been a Move. As exciting as it sounds, it’s actually taken a toll on us.
My handsome hubby and I have enjoyed the sun and had some fun too.
The kids are having a blast and are awesome swimmers now. I guess you would be to if you were in the pool 6 to 7 days out of the week.
But most importantly it’s been all about spending time with the family.
We’ve seen my brother play at the fields.
Enjoyed Broadway!
And some simple yet needed fun. Cheers!
But now the fun is over. We are renovating my parents home and it has completely consumed our happy lives. For me it’s fun but maybe not so much for my family. I will happily blog all about the Reno and all the fun that comes with it!
Stay tuned for all the messes and decisions we make.
Happy End Of Our Summer Vaca,
Jackie
Onward and Downward June 24, 2014
Well – we made the big move down to Florida. Our last week in Illinois was crazy busy and far from uneventful. We said our good byes, see you later and hasta la vista babe to everyone we could. Hugs, tears, long embraces, kind filled words and encouragement were shared between us and my family and friends.
These three cousins will be close friends forever. The bond between them is pretty strong and it’s a blessing to witness.
A few weeks before moving we made sure to spend quality time with family. The kids spent a few weekends with their great-grandmother and hung out with cousins. These are memories for a lifetime and I so wanted them to create them and remember them.
My son and his buddies on their 4th grade field trip. These boys were gentlemen and of course kept me on my toes.
The hillllllls are aliiiiive…
End of the school year bus stop picture. It was a cool rainy morning.
Mother and Daughter Craft Night. If my memory serves me right, the theme was Luau. 🙂
Count down to the last of the school year. This day was animal print day and she rocked it!
Her last chalk sketch on our driveway. Tear 😥
I really have to laugh at this picture every time I see it. I love these kids. Shall we say they are preparing to soak up some sun in Florida.
Getting some last-minute friend time.
Anthony made sure to get all the bike riding in that he could. I really don’t blame him. Reminds me of the ET scene when all the kids were on their bikes in a group. Cute!
The kids long-awaited good-bye. Sweet and endearing. LOVE THEM!!!
This picture was taken sometime during the last week of school. I just love this picture and had to share it.
Last day of school and the gang is posing for us moms.
The Sunday before we left I got together with some of my cousins and took the kids out for some fun. Nothing like a canoe ride!
Our next generation of craziness. I wouldn’t have it any other way.
Fun times on the coaster!
And seriously how sweet is this picture of Arianna with her dance teacher. Melt my heart. I only hope we can find another teacher that can compare.
My kids and their Awesome cousins after a full day of fun.
I know I know – she needs to stop being so darn cute and continue rocking them boots!
My B-Boy with his Hip Hop teacher. She’s awesome too!
Well here it is. The truck filled with all our things. Still can’t believe it.
This was really truly our last good-bye to our home. How sweet are my babies taking a last look. Good times and memories.
Happy Moving,
Jackie
For The Love of Fuchsia, Lime Green and Pets! March 1, 2014
My daughter loves fuchsia, lime green and every pet you can imagine. So when I asked for her help on my next mood board, you better bet it was all about ARIANNA! Why not – right?! Here are her picks that made the finals.
(All items found on http://www.wayfair.com site)
1. Fuchsia Chevron Rug
2. Laura Ashley Home Neville 1 Light Pendant
3. Safavieh Burton Hide Away 3 Drawer Writing Desk
4. Cheungs Snap Lock Box (Set of 2)
5. Sole Designs Pinky Chain Cotton Slipper Chair
6. Pets Rock Canvas
7. Pup Canvas Wall Art
8. Synthetic Grommet Curtain Single Panel
9. Lullaby Paints – Lime Time Eggshell Paint
10. Lullaby Paints – Hushed Paint
Arianna’s American Girl Adventure January 28, 2014
My little girl asked for her first American Girl Doll and this winter we fulfilled her wish. Christmas morning for her was just a bit more special when she opened her doll. You know that saying ‘Twinkle in the eye’? I swear I saw the twinkle in her eye when she realized just what she was opening.
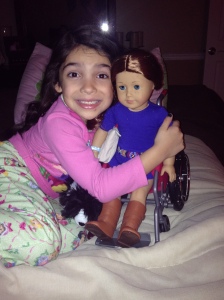
This picture was taken soon after all the gifts were opened. PJ’s still on and all.
Speaking of PJ’s she received these adorable matching PJ’s as a Christmas gift from her cousin. Just know these are getting plenty of use.
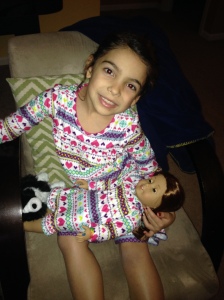
Arianna has completely become a fan of the American Girl Dolls. I’m in for it but I love it. It’s cute and simple and fun! Oh to be a kid again. This morning (in the picture above) she was waiting for the announcement of the 2014 Girl of the Year. She is totally excited the new doll Isabelle is a ballet dancer like herself.
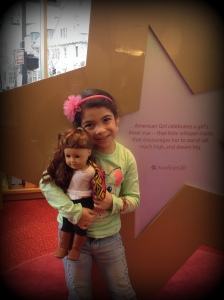
With the excitement level still high, my husband and I knew we should let her have the total American Girl Doll experience and planned an afternoon at the American Girl Place downtown Chicago at the Water Tower Place.
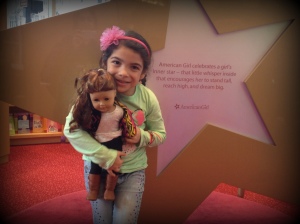
Here is what I think is American Girl’s mission statement:
American Girl celebrates a girl’s inner star – that little whisper inside that encourages her to stand tall, reach high, and dream big.
How beautiful and inspiring!
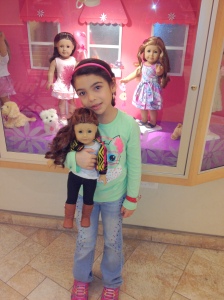
Throughout the store (which is two-stories of fun) you will find these cute window scene setters. This window display is her favorite because of all the pets. Arianna is a pet lover and has asked me for almost every pet you could possibly ask for.
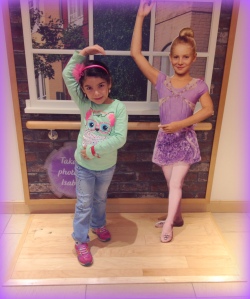
Meet Isabelle the 2014 Girl of the Year doll. Strike a pose – anyone?!
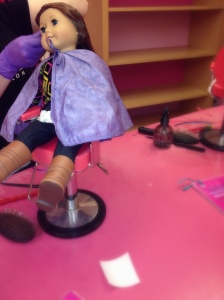
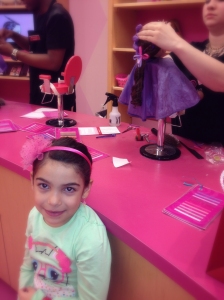
Within the store, you will find a hair salon for the dolls. Yes – you heard me correctly. Here they style, curl, color and braid your dolls hair. I gave her a choice – buy another outfit or get Saige’s hair done. Girl’s gotta have good hair, right?! It’s hilarious and just adorable. Each doll has her own stylist, has to make an appointment (usually within 15 minutes), and has her own chair station. Really?! I’m not joking. I have the pictures to prove it 🙂
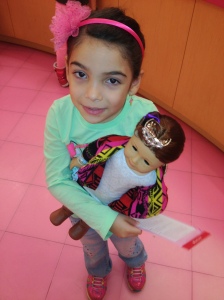
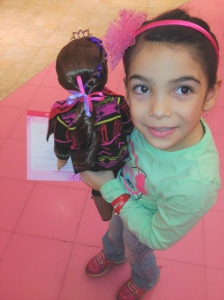
Check out Saige’s new hair do. Tiara and all. She received the works. Style, curl, color and braid. Both these girl’s are spoiled.
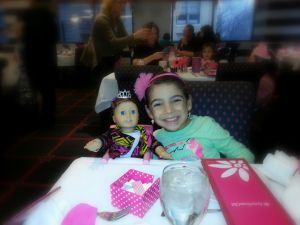
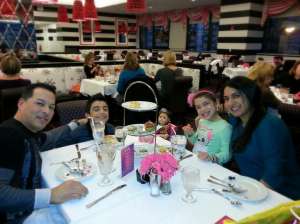
Off we go to have tea time at the in-store restaurant. Um…super charming and extremely enchanting. They give high chair seats for the dolls so they can sit next to you. The dolls also get a little tea-cup that the little girls get to take home. Seriously, they have thought of everything. In the little pink and white polk-a-dot box they had conversation starters typed on pretty paper. Oh – and if you don’t have your American Girl Doll with you for whatever reason, they give loaner dolls. Like I said, they’ve thought of everything.
My son, poor thing, was so patient and honestly loved to see his sister so happy. He was beside himself when we told him he could get anything extra on the menu. That shake was his choice. It caused a chain reaction because the hubby and Arianna got one.
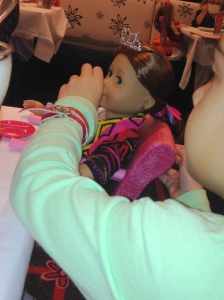
Here Arianna is giving Saige pretend tea from the tea-cup I mentioned before.
Loving that shake!!
The restaurant is gorgeous.
That is our silly girl. I may need to teach her tea time etiquette.
The little BLT sandwiches, scones, flower shaped fruits and much more were delish.
Here are my handsome men. Love!!
If you take a close look in between my two handsome men, you will spot a harpist. We enjoyed the beautiful music of the harp while we ate. Extremely a darling touch.
I love that smile.
At this point, silence. It was attack the shake time. Priceless.
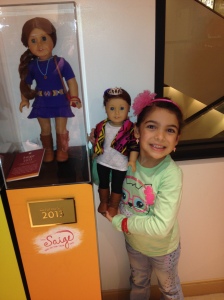
After tea, we headed out but not before we took a picture next to Saige the 2013 Girl of the Year. She is nestled in a glass box for safe keeping.
So there it is, the beginning of a new phase in this little girl’s life. I call it an adventure but my husband has another word for this phase – broke. HA/HA
Happy Adventuring,
Jackie
Kids Lounge January 21, 2014
A few months ago I decided to paint and rearrange the kids lounge. They hang out in the room daily and it needed some sprucing. I decided to paint, get rid of a few things, buy some items and rearrange the furniture. I do need to invest in a proper sofa and ottoman soon because my babies are growing 😦
First things first, prep the room for painting. I had to take everything down off the walls and fill in the holes with filler and did some sanding as well. I then primed the patches before painting. This progress isn’t the funniest part of painting but it makes for a beautiful clean and smooth wall.
Let the fun begin! I get my painting tools together after I laid down the painters cloth.
Here is the color I decided on Warm Cocoon. It’s warm and cocooning. LOL
I love painting and pouring the paint so I can begin rolling is my favorite part.
I started the painting as soon as I dropped the kids off at the bus stop and was done by the time I had to pick them up. That evening I started to put things back into place and deciding where I wanted to place the bookshelf and the dry erase board.
The next morning I continued while the kids were in school and my goal was to have everything in its place by thetime I had to pick them up.
The dry erase board was a hit and till this day is heavily used.
I love this floor lamp I found and placed it next the table so the kids have extra lighting when they are doing homework, coloring or reading.
I added this placemats for a pop of color. I couldn’t resist. I filled the little tins with everyday items like pens, pencils, crayons and candy jars filled with snacks. I switch the snacks weekly so the kids won’t get bored. They love it.
These over sized pillows are placed in front of the book shelf. All the kids use them when they play the guitar, grab a book or simply to relax on.
Here you can see I tried my best to organize the books as best I could but honestly it never looks great. Books come in so many shapes and sizes and colors that it looks like a mess always. But hey, a girl can try. I also stored board games they love to play.
My daughters guitar. She loves to play!
We get a lot of play from this.
This is the current seating and again I mentioned we need something more comfy.
I found these chevron pillow covers at Hobby Lobby and love them. Such an easy change.
I also found this chevron rug from Hobby Lobby and place it under the kids computer. Love!
On the desk I placed this desk lamp that is similar to the floor lamp. All of things patterns and textures have pulled the room together and I am happy about it 😉
OMG…this is my most favorite item in the room. I have this 20×20 frame (fairly large statement) and placed some artwork from my kids when they were in pre-school. I LOVE it and smile when I see it.
Here’s a quick and inexpensive wall art project.
On my shopping adventures I found canvases on sale. At home I had quilting hoops I had no idea what I was going to use them for. So my light bulb went off and bought the canvases and fabric.
I hot glued the fabric onto the back of the canvas and the quilting hoops.
Check it out!
For less $15 I got 4 new pieces of wall art. Now that’s what I’m talking about!
Happy Lounging,
Jackie
Bacon Egg Cheese Sandwich January 18, 2014
This is a great sandwich for breakfast and lunch – or brunch 🙂
Start by boling 2 eggs per sandwich. I was making a sandwiches for my dad and myself.
While the eggs boil, fry the bacon strips.
2 strips per sandwich is enough but I won’t judge if you put more.
Choose bread of choice.
Let me show you a quick mayo spread for your sandwich. It’s super fast and can be mixed while the bacon is frying and the eggs are boiling. First, put about 1 tablespoon of mayo (per sandwich) in a bowl.
Next, grab any mustard you have on hand.
Add about a teaspoon to the mayo.
I like a little hot sauce so…
a few dashes were snuck in too.
Mix all together.
Remove the eggs from the boiling water and peel off shells.
Slice like so.
Spread the mayo on the bread slice.
Now place the slices of eggs on top of the mayo. This way they stick to the mayo and won’t slip out. Slippery suckers.
Yummy bacon time!
Place cheese next. If you work fast enough, the cheese will melt a bit from the heat of the eggs and bacon. Or place in micro for 20 seconds if need be. It won’t hurt the sandwich.
Looks delish!
Happy Brunching,
Jackie
Banana Nut Bread January 13, 2014
This Banana Nut Bread recipe is my moms. We have been baking it for years and I enjoy every mouth-watering crumb.
Ingredients:
1/2 cup of butter
1 cup of sugar
2 eggs
3 bananas (ripe)
2 cups of flour
1/2 tsp of baking soda
1/2 tsp of baking powder
1 cup of nuts (optional)
Gather ingredients and pre heat oven to 350 degrees.
Pour 1 cup of sugar into bowl and add 1/2 cup of butter. Cream the butter and sugar.
Add the 2 eggs and mix.
Mash the 3 bananas in a separate bowl and then add them to the mix.
My daughter took over and I started to add the remaining ingredients.
Add the 1/2 tsp of baking soda and the 1/2 tsp of baking powder. Then slowly stir in the 2 cups of flour.
No mixer is necessary- just mix till the batter looks similar to the above picture.
At this point, you may also add the nuts.
I decided to add nuts to only one of the loaves and sprinkle them on top instead of in the batter. Make sure the loaf pans are greased.
The loaves should bake for 50 minutes to an hour. Use a fork to check center of each loaf.
Once they are baked fully, remove from the oven and place on a cooling rack.
The Banana Bread is moist and light and fluffy. Like I mentioned earlier, mouth-watering. Mmmm!
Enjoy the bread warm or at room temp. Either way – Yum.
Happy Baking,
Jackie
Jackie’s Maraschino Cherry Muffins with Walnut Chips December 24, 2013
Gather Together:
- 1/4 cup butter, soften
- 1/2 cup brown sugar
- 1/2 cup granulated sugar
- 2 eggs yolks, well beaten
- 2 eggs whites, stiffly beaten
- 1 cup all-purpose flour
- 1/4 teaspoon baking powder
- One 10-ounce jar maraschino cherries
- 1/2 cup walnut chips, or any nut you prefer
- Powdered sugar, for dusting
- Cupcake liners
Directions:
Preheat the oven to 400 degrees F.
Put 1/4 cup of butter in a mixing bowl.
Add 1/2 cup brown sugar to the butter.
Cream the butter and brown sugar.
Then cream 1/2 cup of granulated sugar.
Add the beaten egg yolks,
1 cup flour, 1/4 teaspoon baking powder and
2-3 tablespoons of the cherry juice.
Blend well then fold in the egg whites.
Now the batter is ready.
Place in the cupcake liners.
Sprinkle 1/4 teaspoon of walnut chips in the bottom of each muffin cup.
Spoon in batter till muffin cup is half full.
Then place a cherry in the center of the batter.
Don’t they looked lovely?
Sprinkle a little more walnut chips on top of each muffin.
Bake for 20-25 minutes.
Remove from the tins and place on cooling racks.
Be careful – the muffins are hot!
Dust the muffins with powdered sugar.
Mmmmmm!
Now it’s time to eat. Go ahead. I know you want to 🙂
These are great to take to brunch, have one for a breakfast snack or a midnight snack.
Don’t worry…I won’t tell anyone.
Happy Muffin Munching,
Jackie
My Grand Spankin New Piano December 5, 2013
Well, not technically new but a make over.
In the spring I ran into a phenomenal deal for this piano and knew it was MINE.
The only scary thing was the condition of it and frankly moving the heavy darn thing. My poor husband always gets sucked into my finds.
It really doesn’t look to bad, right?!
Wrong.
When your up close, the paint job was B-A-D, BAD. They applied one coat of an oil base paint and it was chipping and the paint had runs dripping down. It was crazy.
So off I went to start scraping away.
Blah.
I spy an SB coffee. HAHA. I needed some motivation.
This was a big job for sure.
After the third day of laboring away and scrapping my life away,
I cleaned everything and vacuumed the paint chips and started to sand the piano down. Ugh…another tedious and extremely dusty task.
Here the first coat is painted.
It’s already looking better.
Before I started working on the piano, I actually worked on the bench. The lid was pretty beat up so it gave me the excuse to rocked it out with some ‘not so common’ fabric. Yeah!!
Off to Hobby Lobby I went. My Fav.
Check it out. I found this on SALE.
Yes it’s zebra print but with warm colors. I figured I could go for it since it’s being used in a smaller amount.
Okay Okay back to painting the bench.
I removed all the hardware from the lid and got ready to paint.
Here’s my paint of choice.
This paint was looking a bit purple when I applied it that it scared me a bit at first. But soon after, all is well.
The paint had to dry so I went ahead and started to plan out how I wanted to cushion the bench.
I had a 2″ poly foam leftover from another project and batting so I saved some money there.
I love saving money 🙂
I did apply a coat of paint on the backside of the lid because it will be seen when retrieving lesson books.
Prepping the material and padding is crucial so I tripled checked my placement so I had enough padding and fabric to pull all around each edge. I prepped my staple gun and was ready to start.
The corners get tricky and sometimes you have to improvise. I had to cut a piece off each corner to make sure the lid would close properly. No big deal and no one but you and I will notice.
Make sure to tuck the fabric in and pull it just enough to taunt the material.
I then placed the hardware back on.
It came out great!!! Don’t you think?!
With all my efforts, sweat, time, dedication, caffeine induced jolt, tired muscles, fatigue, energy and love I’m officially done and genuinely proud.
Now to get my children piano lessons so it can be used properly and not for banging. HaHa
Happy Symphony,
Jackie
Basket Pendant Inspiration September 6, 2013
Here is my inspiration. I found her at Shades of Light for $169. It’s called Chicken Wire Basket Pendant Light.
When I saw it, I loved it and knew it could be my next DIY project.
While I was out and about shopping for things for the home, I found this fruit bowl from Target.
Yup – I said fruit bowl. This is my jumping point, I was extremely excited to find this that my next stop was Home Depot. I purchased a Mini Pendant Kit and Edison Bulb.
The Mini Pendant Kits come in a variety of colors and I already knew this bronze color was available. The cord comes lengthy and you can adjust it according to your liking.
Here are the tools and items I needed:
fruit bowl, Edison bulb, mini pendant kit, sharpie and wire cutters. That’s it!!
I twisted the ring off the mini pendant and with the sharpie traced it in the center of the fruit. That way the cuts would be precise and centered.
Next, I recruited my husband for his strength. The wire cutters are easy to use but he happens to be a lot stronger so I figured why not ask him.
Here is the piece he cut out.
Fits perfectly but I didn’t like the white part in which the bulb twists in.
Do you see what I mean? The white just doesn’t look right.
Hmmmm… what to do?
Remove it.
Wrap plastic around the bronze part to prepare to be sprayed.
We had extra spray paint from a project we had done the week before and the color was spot on. Notice he stuffed the center with paper towel so no damage would happen to the inner components.
I waited a couple of hours after we sprayed and viola! It looks soooo much better. This is the work I like to produce.
Now we can install it. This will be going into my laundry room I just repainted (will post reno soon).
Remember I said the cord can be adjusted? Here we are deciding where we want it.
It’s hung and ready for the cool Edison Bulb.
There she is. I spent a whole $35 for her.
So glad a light bulb went off when I found the fruit bowl. HAHA – pun intended!!
Happy Inventing,
Jackie
Recent Comments